Quick summary: Your FlowSpace Mat inflates in under 3 minutes, deflates in under 5, and folds back into its carry bag in one smooth motion. This guide walks you through each step so your first session goes perfectly — and every session after that.
1
What's In The Box
When you open your FlowSpace Mat package, you should have:
-
✓The FlowSpace Mat — rolled and secured inside the carry bag
-
✓Electric pump — with power cord and inflation/deflation nozzle attachments
-
✓Carry bag — with shoulder strap for transport
-
✓Repair kit — patch and adhesive for any punctures (you probably won't need it, but it's there)
💡 Tip: Before your first inflation, lay the mat flat on a clean surface and do a quick visual inspection. Check the valve cap is tight and there are no visible issues from shipping.
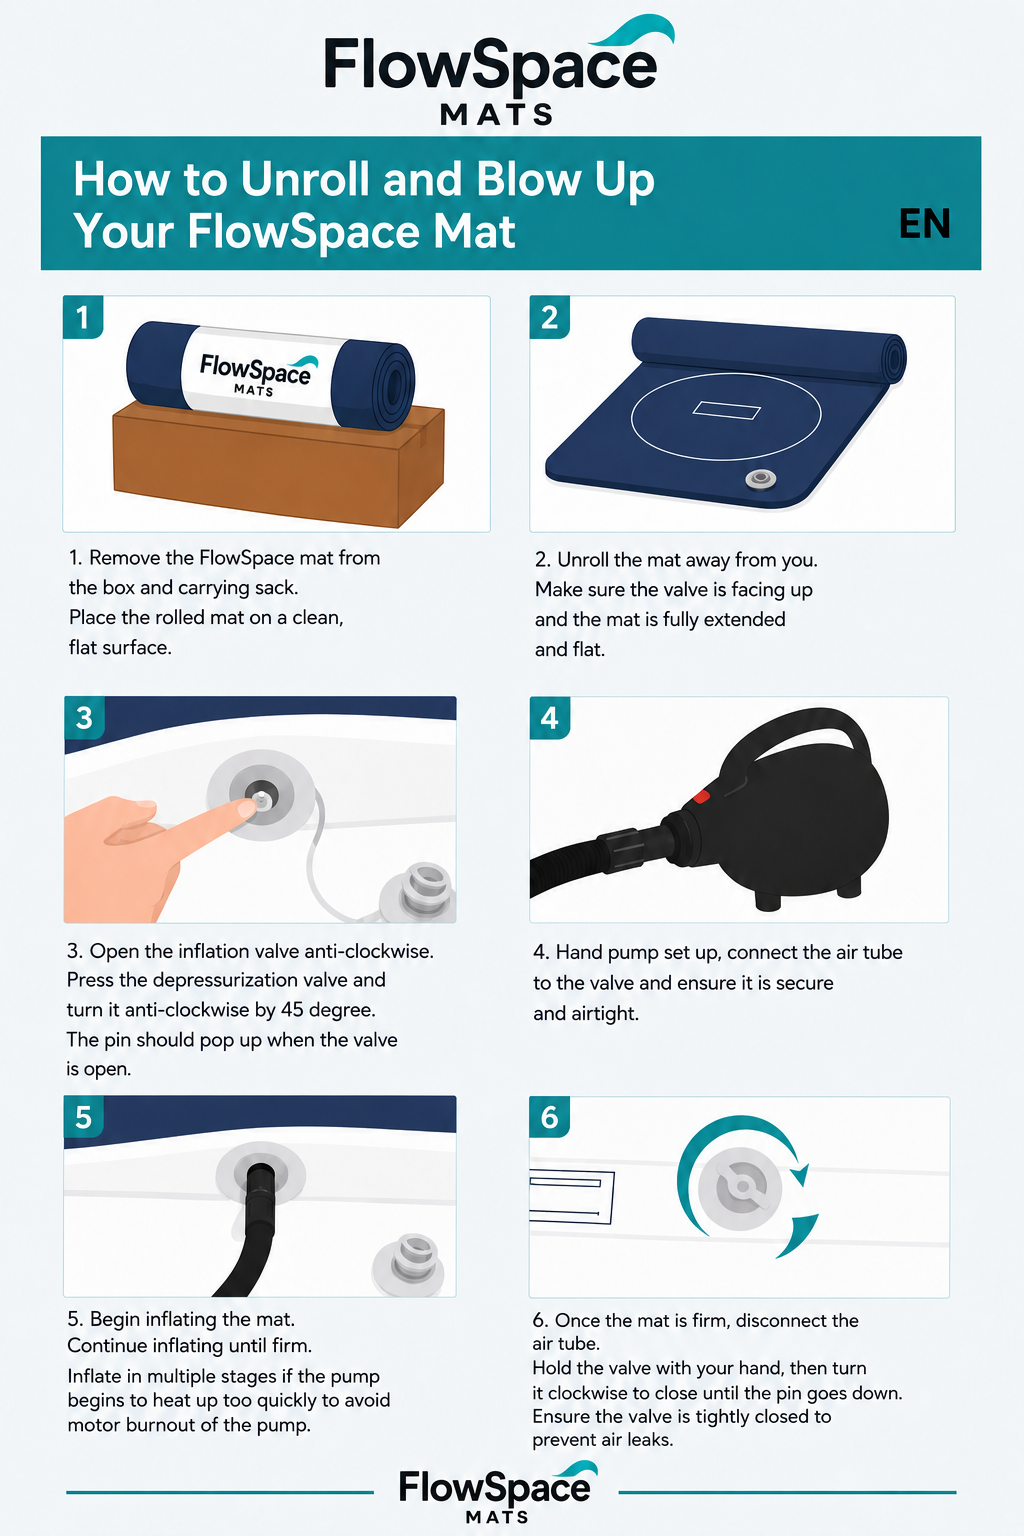
2
How to Inflate Your Mat
Inflation takes 2–3 minutes. Here's the exact process:
-
1Unroll the mat on a flat surface — indoors or outdoors. Any flat ground works.
-
2Locate the inflation valve — it's on the side of the mat, covered by a screw cap. Remove the cap and set it somewhere safe.
-
3Attach the inflation nozzle to the electric pump. The nozzle pushes into the valve and locks in place.
-
4Plug in the pump and turn it on. You'll hear the mat filling. Walk away — it doesn't need supervision.
-
5Check firmness at 2 minutes. Press your palm flat on the surface. It should feel firm — not soft, not bouncy. If it needs more air, run the pump another 30–60 seconds.
-
6Remove the nozzle and replace the valve cap immediately. Screw it tight. This is the most important step — a loose cap will let air escape during training.
💡 Firmness tip: For grappling and BJJ, you want the mat firm enough that you don't feel the ground underneath you when you post your hand. For yoga or stretching, slightly softer is fine.
3
Your First Training Session
Once inflated, your mat is ready to go. Here's what you can do on it right out of the box:
BJJ & Grappling
Guard passes, takedown entries, solo drilling, partner rolling. The surface grip is identical to academy mats.
Wrestling
Shots, sprawls, tie-up drilling. 900 lb capacity — no flex, no slide.
Yoga & Mobility
Flows, stretching, and recovery work. Cushioned enough for joints, stable enough for balance poses.
Strength & Conditioning
Bodyweight work, kettlebells, floor presses. The surface won't slide even under heavy load.
💡 First session tip: Do a few minutes of light movement before going hard. The mat surface is grippy — your feet and knees will thank you for warming up before full-speed drilling.
4
How to Deflate Your Mat
Deflation takes 3–5 minutes. The pump handles it — you don't need to squeeze or roll anything manually.
-
1Switch the pump to deflation mode. There's a switch or reversible nozzle on the pump — flip it to the deflation direction.
-
2Attach the deflation nozzle to the valve. Same valve, same spot. The pump will now pull air out instead of pushing it in.
-
3Turn on the pump and let it run. The mat will start going flat. After 2–3 minutes, it'll be mostly deflated.
-
4Manually press out the remaining air. Walk across the mat or press down with your hands to push out any air the pump couldn't reach.
-
5Remove the nozzle and replace the valve cap. Screw it tight before rolling.
5
How to Fold and Pack the Mat
This is where most people get stuck the first time. Follow these steps and it'll go back in the bag cleanly every time.
-
1Start with the mat fully flat and deflated. Make sure all the air is out before you start folding.
-
2Fold the mat in thirds lengthwise. Bring one long edge to the center, then fold the other long edge over the top.
-
3Start rolling from the valve end. Roll tightly and evenly — don't let it go loose in the middle.
-
4Keep pressure on the roll as you go. Use your body weight to compress it as you roll toward the opposite end.
-
5Slide the roll into the carry bag. Valve end goes in first. If it's not fitting, unroll and try again — the roll needs to be tight.
-
6Zip the bag and you're done. The pump fits in the side pocket or alongside the mat.
💡 Packing tip: The first time takes a few tries. By the third time, you'll have it down to under 2 minutes. The key is starting the roll tight — a loose start means it won't fit at the end.
6
Cleaning & Care
Your FlowSpace Mat is built to last — but a few simple habits will keep it in perfect condition for years.
-
✓Wipe down after every session with a damp cloth or mat cleaner spray. Sweat and oils break down the surface over time if left on.
-
✓Let it dry before packing. Don't roll a wet mat into the bag — moisture trapped inside can cause odor.
-
✓Store it rolled, not folded flat. Long-term flat storage can create creases. The carry bag roll is the right storage position.
-
✓Keep it away from sharp objects. The mat is durable but not puncture-proof. Clear the area before training.
-
✓If you get a small puncture, use the included repair kit. Clean the area, apply the patch, press firmly, and let it cure for 24 hours before re-inflating.
🎁 Keep the Momentum Going
What's Next?
Whether you're training with a partner or keeping your mat in top condition — we've got you covered.
Get Another FlowMat
Train with a partner, expand your mat space, or get one for your kid.
Use code: FLOWFAM for a discount
Shop FlowMats →
Get the Cleaning Kit
Keep your mat fresh and grippy. Designed specifically for FlowSpace mat surfaces.
Shop Cleaning Kit →